TABLE OF CONTENTS
The Time Card is fully accessible and editable through the web portal, eliminating the need to access the desktop interface. Users can create adjustments, edit payroll allocations, assign reasons, and modify the non-wage table.
Accessing a Time Card on the Web
- To open a Time Card, use the Time Card Review interface or the TK Reports.
- Click on the date of the Time Card to open its detailed web view.


Time Card Web Overview
At the top-left of the Time Card timeline, you will find totals reflecting hours worked. These can be the original hours recorded via GPS data or adjusted hours based on modifications applied by a TK Reviewer or TK Manager.

Reviewer Information
The reviewer field is automatically determined according to your company’s approval configuration or can be assigned manually. If the reviewer field is empty due to missing automatic assignment, manual assignment may be necessary (use Reassign button on the top right).
Timeline Totals Explained
- GPS Timeline: Derived from Time Entries.
- Clocked Hours: Total hours originally recorded; may differ from approved hours due to adjustments.
- Approved Hours: The total approved hours for all time entries in the Time Card; this value reflects any manual or automatic adjustments.
- Lunch Hours: Comprise manual lunch hours added via the mobile app and hours recorded through lunch audits.
- Manual Lunch Hours: Stored in Time Entries; audit adjustments are retrieved from the Time Card's Audited Lunch field.
- Audited Hours: Hours reduced by audits, calculated as Clocked Hours − Approved Hours − Manual Lunch Hours
- Total Hours: Calculated as Approved Hours − Audited Lunch Hours

- Adjusted Timeline: Sourced from Time Card Adjustments. Note that the Lunch Deduction field in the adjustment card only includes lunch hours entered specifically in this field; manual lunch hours are already deducted and show a duration of zero.

Top-Right Interface Elements
The upper-right section contains Time Card actions, the current Time Card stage, and key markers such as reasons applied, the number of active Time Adjustment Requests (TARs), Time-Off Requests, dispatches, and more.
For detailed information on Time Card stages and markers, refer to the Time Card Review documentation.

Time Card Actions
- Hide/Expand Timeline: Toggle the visibility of the Time Card timeline, showing either GPS or adjusted data.
- Solicit TK Request: A Reviewer or TK Administrator can request an employee to create a specific Time Keeping request for the selected date. Further details on this feature are available in the solicitation documentation.
- Reprocess Time Card: This function refreshes GPS data, updates Time Entries, reruns audits, recalculates payroll allocations, and computes mileage. It is available to all users with access to the Time Card Review interface, including Administrators, TK Managers, Advanced TK Reviewers, and standard TC Reviewers.
- Options for changing Time Card review state:
| Action | Available for | There is TC Adsjutment | Result |
| Confirm | Reviewer, Advanced Reviewer | No | from Pending → Acknowledged |
| Change Time | Reviewer | No | from Pending → Change Time |
| Confirm | Advanced Reviewer | Yes | from Pending → Adjusted |
| Complete | TKA, Employees with the role "Can complete Time Cards/Requests" | — | from Pending/Acknowledged/Change Time/Adjusted → Completed |
| Reject | TKA | — | from Completed/Acknowledged/Change Time/Adjusted → Pending |
Click on the action to change the review state, add comments if required.
5. Reassign Reviewer — redirect a TC to another Reviewer. Add comments if required.
Timelines Tab
The Timelines tab presents the employee's daily activity log, visually displayed on a map on the left side. It includes the original GPS timeline and, if applicable, an adjustment interface located on the right.
The Day Log is represented as a timeline that details the employee’s daily movements and activities. It shows which locations the employee visited, whether they entered scheduled sites, and if any unauthorized stops occurred. Each segment of time corresponds to a continuous period associated with a specific Cost Type and Work Order (WO), as relevant. Additionally, the timeline records the mileage the employee has driven during the day.
Read more about the TC Map and GPS Timeline functionality here.

Advanced Reviewers and TK Administrators have the ability to correct the original timeline by creating adjustments. To do this, click the Create Adjustment button, which opens the adjustment interface. An adjustment will be created based on a copy of the original GPS timeline.
These adjustments allow you to:
- Modify time periods by shortening or extending them as needed.
- Eliminate hours spent during unauthorized stops by zeroing out those times.
- Change the Work Order allocation.
- When applicable, update the state, tax code, or activity allocation.
Once you complete the adjustments, click Save. The system will immediately apply your changes to the payroll allocation. To review the updates, navigate to the Allocation tab where the modifications will be reflected.

Allocation Tab
To view detailed information or make changes, switch to the Payroll Allocation tab within the Time Card. This tab displays how the hours are distributed across Cost Types and Work Orders, including the breakdown of regular, overtime, and double-time hours.
The top section of the Allocation tab presents general information such as the Payroll Period, Employee Category, Reason field, total lunch hours (manual, audited, applied), mileage, and totals from the Wage Allocation table.

On the left side, information on Sick and Vacation/Paid Time Off (PTO) bank balances is available. Clicking the Info icon displays these balances.
- Sick Hours Available to Request is calculated as: Sick Available - Sick Hours Used Not Synced - Sick Hours Req
- Sick Hours Requested (Not Completed) represents hours from pending or approved Time Off requests marked with the cost type “Sick.”
- Vacation Hours Requested (Not Completed) indicates hours from pending or approved Time Off requests marked with the cost type “Vacation.”
- Vacation Hours Available to Request is calculated as: Vacation Hours Available - Vacation Hours Used Not Synced - Vacation Hours Req

Actions in the Allocation Tab
- Open Component Cards: Click blue hyperlinks to open detailed cards either in the web or desktop interface. Ensure integration with the desktop system is enabled to access desktop records. For example, clicking a Work Order in the table opens its web card, where you can make necessary changes such as managing activities.
- Change/Delete a Reason:
- Locate the hyperlinked Reason field → click on it.
- In the window that opens, make the necessary changes: set a new reason or delete it.
- Click on Save → the TC Payroll Allocation table will be recalculated.


Wage Allocation Table
The Wage Allocation table consolidates all data such as Cost Types, Approved Hours, and associated Work Orders (WOs). This information is populated either from the Time Entries reference directly or from applied Time Card (TC) adjustments. The table rows are arranged chronologically, and Approved Hours are aggregated by Cost Type, WO, and State.

Columns Explained:
- Start and Finish: These columns display the start and finish times of original GPS periods or adjusted times. Rows added manually will have these fields empty.
- Cost Type: This determines the wage type and payroll item associated with the employee’s recorded hours. The Cost Type is assigned according to a priority scheme:
- Rows with Reason hours are assigned to a reason-specific Cost Type.
- Non-work hours are written off to a non-work Cost Type.
- If a Cost Type is configured at the Work Order Type level, all hours logged for that Work Order are recorded under that Cost Type.
- Employees may have a default Cost Type; in such cases, all hours recorded for that employee are merged into this Cost Type.
- Cost Types may originate from either the GPS timeline or adjustments, if applicable.
- Work Order: Automatically calculated during GPS processing or manually assigned/overridden in the Adjustment interface or directly in the table.
- State: The Payroll State is determined based on specified rules regarding the use of GPS coordinates, governed by system setting. The logic is as follows:
- For Reason hours (e.g., time-off, holiday, vacation) assigned to a Non-Work Work Order, the system uses the employee’s Payroll State regardless of whether it is fixed.
- A Fixed State from the Employee card applies to all rows.
- If GPS States are enabled:
- Each row represents a Time Period from the TC Adjustment and is processed chronologically.
- The State is derived from the Time Period in the Adjustment, which may be sourced from the original Time Entry, allocated WO, or entered manually.
- Alternatively, if GPS States are enabled:
- Each row corresponds to one Time Entry, processed in chronological order.
- GPS State is extracted from the Time Entry based on GPS coordinates of Stop and Drive entries.
- When traversing multiple states, drive time is split into multiple entries based on hours spent per state, with a minimum of 5 minutes per state.
- If no Fixed Payroll State, TC Adjustment, or GPS State is present for a period (row), the system takes the State from the Site Address of the Work Order assigned to that row.
- If all previous steps fail, the system defaults to the State on the Employee card.
- Tax Code: This column appears only if Tax Code functionality is enabled. Tax Codes are Site-specific and calculated based on GPS data.
- Activity: A customizable column, populated from the allocated Work Order but can be overridden within the table.
- Tip: Fill in the Work Order first to populate the dropdown with available activities.
For more details, refer to the documentation on State Overtime Laws, Tax Codes and Work Activities.
- PW Column
The PW (Previaling Wage) checkbox appears in Scenario, Site, Build Plan, Work Order Type, Work Order, and Dispatch. When a Work Order is created, the system checks these objects for the PW status. If any have PW enabled, the Work Order is marked PW, which can be edited manually.
- Dispatches inherit the PW status from the Work Order but can also be changed.
- Hours linked to PW Dispatches or PW Work Orders (without a scheduled Non-PW dispatch) are classified as PW hours.
- You can manually toggle the PW setting in payroll allocation. The system will then recalculate regular, overtime, and double hours based on Payroll State limits.
Hours Columns
Hours in the payroll allocation are assigned based on Wage Type.
- Regular hours that exceed the State's predefined total daily or weekly limits are reclassified as Overtime hours.
- If Overtime hours further exceed their respective limits, the system calculates Double Time hours accordingly. These limits apply to both Prevailing Wage (PW) hours and standart (non-PW) hours.
- The Overnight mark in the payroll allocation table identifies overnight shift hours. This is a configurable feature that allows the use of either standard overtime rules or specialized overnight shift rules to properly calculate overtime.
- The OT Exclude column is calculated based on overtime rules configured in Cost Type, State, or TK Configuration cards. Overtime rules operate across several dimensions:
- Cost Type: Determines whether hours under this cost type are included or excluded from overtime calculations.
- State: Hours related to certain states can be excluded from overtime.
- Employee: Overtime calculations can be entirely disabled for specific employees.
- Employee + State: Overtime can be selectively excluded for certain employees when related to specific states.
The OT Exclude column is recalculated during these events:
- Adding a new row with a selected Cost Type, State, or Employee in the Time Card.
- Modifying the State, Cost Type, or Single Payroll State field in any row.
- Performing the Recalculate Payroll Allocation action manually or automatically.
- Automatic recalculations occur during TK processing—such as after adding adjustments, during FD Update scripts, or Payroll Period Closure processes—for all non-locked Time Cards (TCs).
- The Locked Wage Type can be set manually to override the automatically determined Wage Type in payroll allocation. If a reason is defined in the Time Card, the Locked Wage Type defaults to Regular.
For comprehensive guidance, consult articles detailing overtime and double hour calculation configuration.
Lunch in the Allocation
There are two types of lunch periods accounted for in payroll allocation:
- Manual Lunch: These are non-working time entries manually recorded via the Mobile App or adjustment interface, and are subtracted from total clocked hours. Manual lunch periods appear in a dedicated Manual Lunch table beneath the Wage Allocation table.
- Applied Lunch: This represents lunch time
- that defaults to audited lunch periods
- can be derived from the Lunch Deduction field in adjustments
- or modified manually
- The system deducts applied lunch time from the payroll allocation line with the highest hours, provided the associated Cost Type does not exclude lunch.
To exclude lunch hours from certain Cost Types, enable the “Lunch Exclude” checkbox in the Cost Type settings.
If you wish to exclude applied lunch hours from payroll allocation entirely, simply clear the Applied Lunch field.


Non-wage Allocation Table
The Non-Wage table is calculated when a TK Administrator completes a Miscellaneous request. All data (payroll item, Work Order and QTY) is pulled from the TK request.
TKA can make changes in this table: add new lines, change payroll item, QTY and so on.
We do not sync the non-wage table with the payroll system. Data from this table is factored into Time Card financial distribution.
We use the same priority of cost rates and financial accounts for the lines from the non-wage table in the financial distribution. One difference is, that you can specify a particular financial account for the payroll item, and it will predominate over financial accounts from Work Order Type, Employee and so on.

Edit Allocation
- To make changes in the Allocation tab, switch to edit mode by clicking the Edit button on the right. You can modify any editable column marked with a small blue triangle icon, including:
- Changing the Cost Type
- Allocating hours to a different Work Order
- Assigning a different State
- If enabled, Changing Activity and Tax Code
- Adjusting hours (overtime and double time are recalculated automatically)
- Marking a row as PW
- Deleting a row by clicking the trash icon on the right


- To add a new row, click Add Row.

- To add non-work hours, click Add Non Work. Select Non Work Cost Type (Sick, Vacation, etc) and enter hours. Click Add to save.

- Rows can be reordered by dragging the six-dot icon next to the desired row. Note that the order of rows affects the calculation of overtime and double hours, as rows are processed sequentially. When a row causes overtime to occur, the system will allocate overtime hours to that row if it complies with the state’s limits.

- After completing all edits, click Save. The Time Card will then display a Locked Allocation indicator.

- To undo manual changes and restore the original payroll allocation (based on GPS data or applied adjustments), click Reset.

Who Can Edit Payroll Allocation
Editing is allowed to:
| Employee Role | Payroll Allocation Tables | |
| Wage Allocation | Non Wage Allocation | |
| Time Keeping Manager | + | + |
| Advanced TK Reviewer | + | |
When You Can Edit Payroll Allocation
Editing payroll allocation is permitted only before the Time Card is included in an approved payroll check that has been synced to the payroll system.
The Time Card’s payroll allocation becomes editable during the Revising Synced Data step of the payroll check closure process:
- Revise and Resync Data: Make changes to the Time Card and push the updated data to the payroll system as a new batch.
- Revise Data: Modify Time Cards within FCX without resyncing the data to the payroll system.
Exception: Employee with Can edit Paid Payroll Data role can modify data within closed and paid payroll periods.
Add Check In
Sometimes a salary employee may miss a check-in. This can happen if no check-in was auto-generated or if the employee forgot to check in using the mobile app.
A TK Manager can manually add check-in hours directly to the employee’s time card.
To add missing check-in hours:
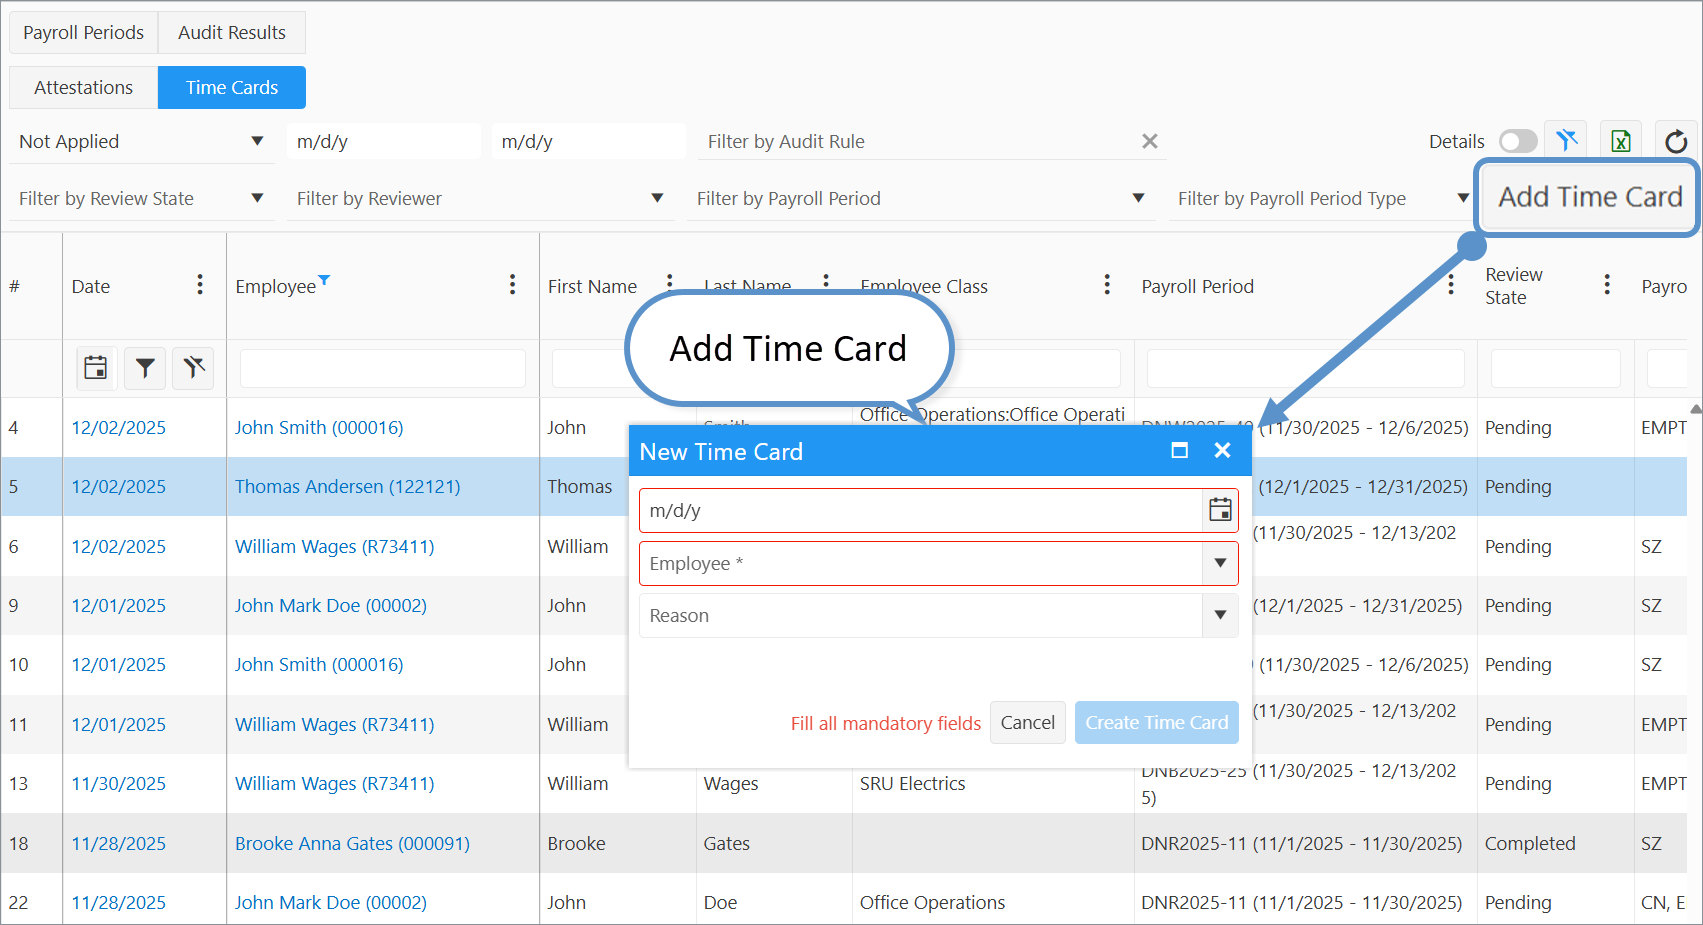
- If a Time Card does not already exist for the required day, create one first:
- Open the Time Cards dashboard.
- Click the Add Time Card button.
- Select the required day.
- Choose Salary Employee as the employee type.
- Do not enter a reason unless the time card is for PTO or a holiday.
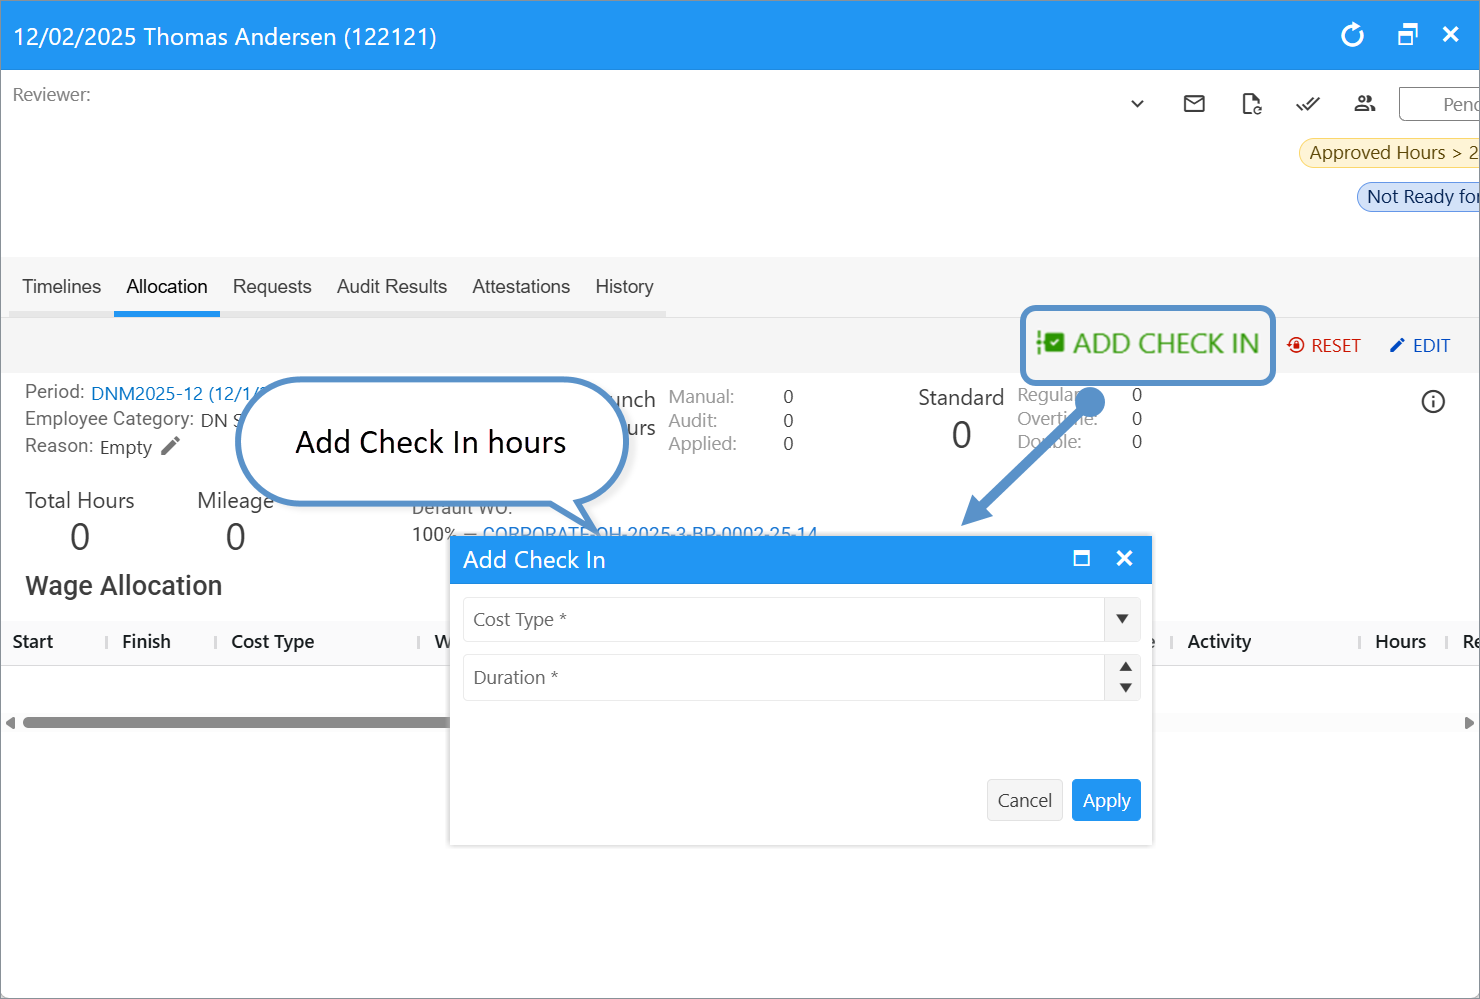
- Open the (newly created or existing) Time Card for that day.
- In the Payroll Allocation table, click the Add Check In button.
- Select the appropriate Cost Type (usually “Office/Warehouse”).
- Enter the number of hours worked.
- Click Apply.
The check-in hours will now appear in the payroll allocation table.
- The Work Order is automatically pulled from the employee’s TK configuration.
- The Cost Type may be overridden by the cost type defined in the employee’s TK configuration.
If necessary, edit the allocation details after adding the check-in.

Was this article helpful?
That’s Great!
Thank you for your feedback
Sorry! We couldn't be helpful
Thank you for your feedback
Feedback sent
We appreciate your effort and will try to fix the article